Chatbot Nodes
Nodes are the building blocks of your chatbot flow in Flowbee.io. Each node represents a specific action or step in the conversation, such as sending a message, asking a question, performing an action, or integrating with external systems.
By connecting different nodes together, you can create a complete chatbot journey that guides users step by step.
What are Nodes?
A node is an individual component inside the chatbot flow that performs a specific function.
For example:
- Sending a message
- Asking a question
- Collecting user input
- Performing an action
Each node is connected to another to define how the conversation moves forward.
Types of Nodes
Flowbee provides different categories of nodes:
- 💬 Send Message
- ❓ Ask Questions
- ⚙️ Actions
- 🛒 E-commerce
- 🔗 Integrations
- 🔄 Dynamic
👉 Each category is designed to handle a specific part of the chatbot flow.
How to Use
- Open Node Drawer
- Select Node
- Drag and drop into flow
- Double-click to configure
Send Message Nodes
Send Message nodes are used to communicate with customers inside your chatbot flow. These nodes allow you to send different types of messages such as text, images, videos, documents, audio, and templates.
They are the first step in most chatbot flows and help you deliver information clearly and effectively.
Available Message Types
💬 Text Message
Send plain text messages to customers.
Use case:
- Welcome messages
- Instructions
- General replies
🖼️ Picture (Image)
Send images to make conversations more engaging.
Use case:
- Product showcase
- Promotions
- Visual guides
📄 Document
Share files such as PDFs, brochures, or invoices.
Use case:
- Product catalogs
- Quotations
- Agreements
🔊 Audio
Send audio or voice messages.
Use case:
- Voice instructions
- Personalized responses
🎥 Video
Send videos for better explanation and engagement.
Use case:
- Product demos
- Tutorials
📩 Template Message
Send approved WhatsApp template messages.
Use case:
- Notifications
- Reminders
- Messages after 24-hour session
Ask Question Nodes
Ask Question nodes are used to interact with users and collect their inputs inside the chatbot flow. These nodes allow you to present options, gather responses, and store user data for further actions.
They are essential for creating interactive and decision-based chatbot experiences.
Available Question Nodes
📋 List
The List Node allows you to present multiple options in a structured list format.
- Supports up to 10 options
- User selects one option
Use case:
- Service selection
- Product categories
- Menu navigation
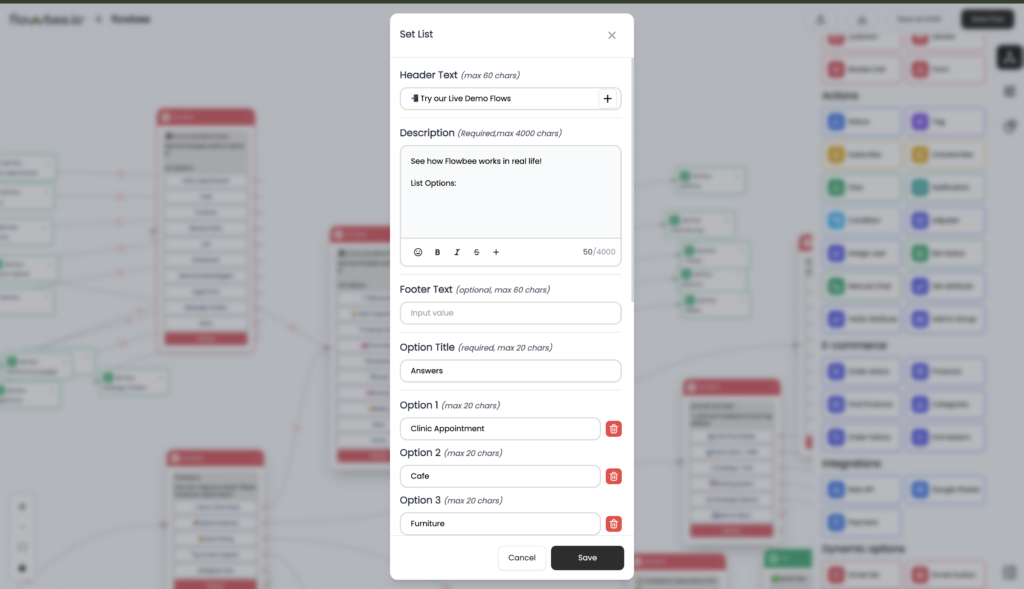
List Node Configuration
When you double-click the List Node, a configuration popup will open with the following fields:
📝 Header Text (Optional – Max 60 Characters)
This is the title shown at the top of the list.
Example:
“Choose a service”
👉 Helps users understand what the list is about
📄 Description (Required – Max 4000 Characters)
This is the main message content displayed above the list options.
Example:
“Please select one of the options below”
👉 This field is mandatory
🔽 Footer Text (Optional – Max 60 Characters)
Displayed at the bottom of the list.
Example:
“Powered by Flowbee”
👉 Useful for additional instructions or branding
🏷️ Option Title (Required – Max 20 Characters)
This is the label shown above the options (like a category name).
Example:
“Services”
🔘 Options (Buttons) (Max 10 Options)
These are the selectable values shown to the user.
- Each option acts like a button
- Each option can be connected to a different node
Examples:
- Book Appointment
- View Products
- Contact Support
👉 Max 20 characters per option
💾 Save Answer in Variable (Optional)
You can store the selected option in a variable.
Example Variable:{{service_type}}
👉 This helps you:
- Use in conditions
- Store user choices
- Send data to APIs
⚠️ Default Error Message (Fallback Message)
This message is shown when the user enters an invalid response (instead of selecting from the list).
Example:
“Please choose one option from the list”
🔁 Default Connection (Fallback Flow)
If the user:
- Does not select any option
- Or sends an invalid response
👉 The chatbot will follow the default connection path
Use case:
- Redirect to help message
- Repeat the question
- Send error guidance
🔘 Quick Reply
The Quick Reply Node provides simple button-based options.
- Supports up to 3 buttons
- Designed for quick responses
Use case:
- Yes / No
- Confirm / Cancel
- Basic choices
🔗 URL Button
The URL Button Node allows you to redirect users to an external link.
Use case:
- Open website
- Payment links
- Product pages
👉 When clicked, the user is redirected outside WhatsApp.
📍 Location
The Location Node allows users to share their location.
Use case:
- Delivery address
- Service location
- Customer tracking
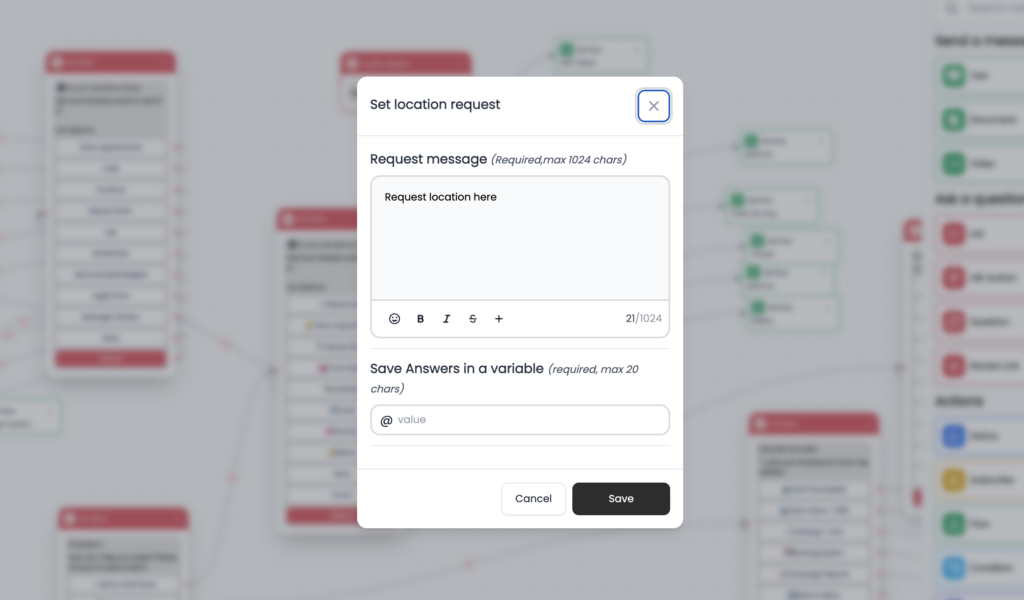
Configuration
❓ Question (Required)
Message asking user to share location
Example:
“Please share your location”
💾 Save in Variable (Required)
Define a variable to store location data
Example:{{user_location}}
❓ Question
The Question Node is used to collect user input and store it in variables.
You can collect:
- Text
- Number
- Image
👉 You can also apply validation:
- Email format
- Numeric values
- Required fields
Use case:
- Collect name, phone, email
- Capture user preferences
⭐ Review
The Review Node allows you to send a predefined review message to users.
Use case:
- Collect feedback
- Ask for ratings
- Customer satisfaction
⭐ Review Link
The Review Link Node allows you to send a direct link for reviews.
Use case:
- Google review link
- Website feedback page
- App review
🧾 Form (WhatsApp Flow)
The Form Node allows you to collect multiple inputs in a structured format.
- Supports multiple fields
- Uses WhatsApp Flow interface
Use case:
- Booking form
- Registration form
- Lead capture
Action Nodes
Action Nodes are used to perform backend operations inside your chatbot flow. Unlike message or question nodes, these nodes do not interact directly with users — instead, they control logic, update data, and automate business processes.
These nodes make your chatbot powerful by enabling automation, decision-making, and system integration.
Available Action Nodes
🔄 Status
The Status Node allows you to update the conversation status.
You can set:
- Open
- Pending
- Solved
Use case:
- Mark enquiry as completed
- Move chat to pending follow-up
🏷️ Tag
The Tag Node is used to add or remove tags for a contact.
Use case:
- Add tag “Hot Lead”
- Remove tag after conversion
🔔 Subscribe / Unsubscribe
These nodes manage customer communication preferences.
- Subscribe → Allow messages
- Unsubscribe → Opt-out (DND mode)
👉 When unsubscribed:
- Customer will not receive broadcasts
Use case:
- Respect customer opt-out requests
🔀 Flow
The Flow Node allows you to connect or redirect to another chatbot flow.
Use case:
- Move from main menu to booking flow
- Reuse existing chatbot logic
🔔 Notification
Send a notification (template message) to another number.
Use case:
- Notify admin
- Alert sales team
- Send lead details
⚙️ Condition
The Condition Node allows you to create logic-based decisions.
👉 Example:
- Age > 16
- Location = UAE
Based on conditions, chatbot can route users to different paths.
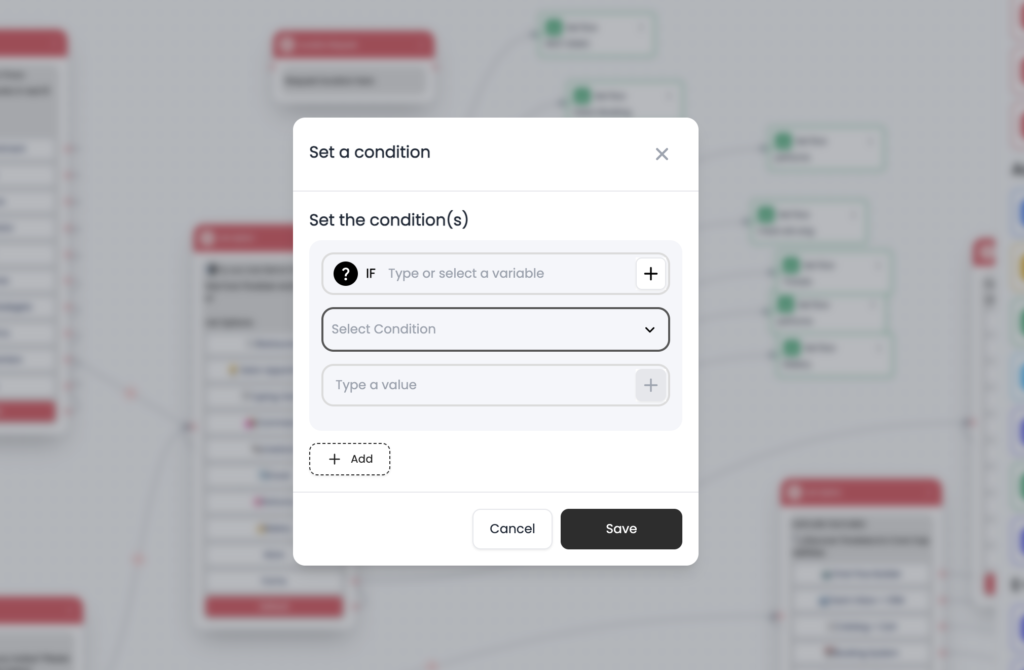
Configuration
When you configure the Condition Node, you will see the following fields:
🔤 Select Variable (Required)
Choose the variable you want to evaluate.
Examples:
{{age}}{{service_type}}{{location}}
🔽 Select Condition (Required)
You can choose from multiple condition types:
- Equal to
- Not equal to
- Greater than
- Less than
- Greater than or equal to
- Less than or equal to
- Is empty
👉 These conditions define how the value is evaluated
✏️ Enter Value (Required – except “Is empty”)
Enter the value to compare with the selected variable.
Examples:
- 18
- “Dubai”
- “Yes”
➕ Add Multiple Conditions
You can add multiple conditions using the Add (+) option.
👉 This allows you to create:
- Complex logic
- Multiple rules
➕ Adjuster
The Adjuster Node is used to modify variable values.
👉 Example:
total = total + 20count = count - 1
Supports operations like:
+-=
👤 Assign User
Assign the conversation to an agent or a team.
- Assign to specific user
- Assign to team
- Round-robin assignment available
👉 Option to:
- Reassign to last user (if needed)
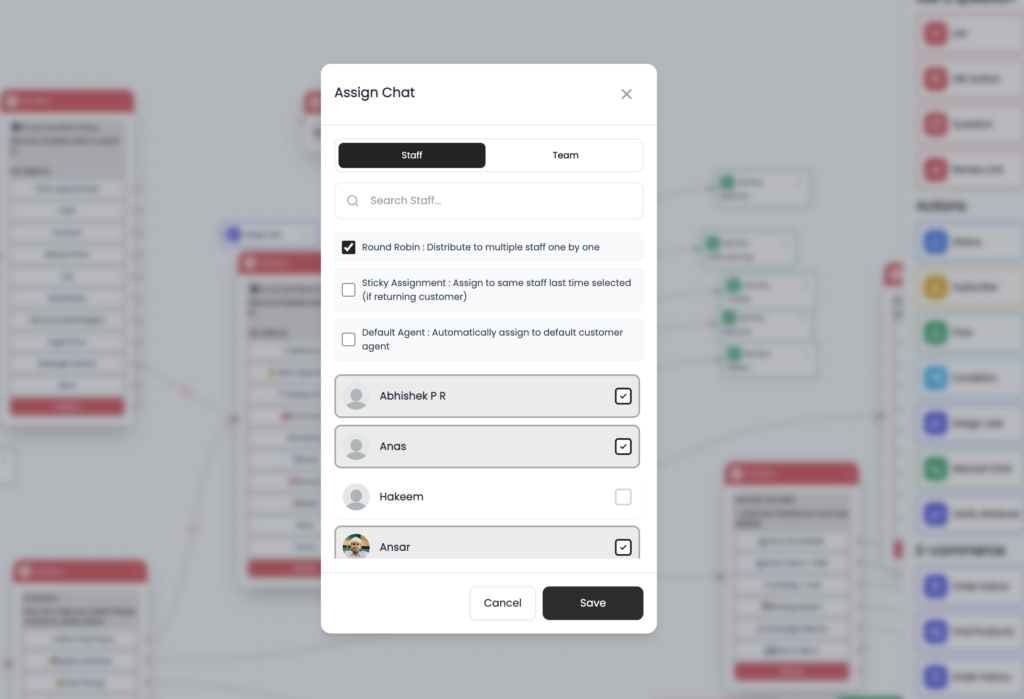
Configuration
When you configure the Assign User Node, you will see the following options:
👥 Assign Type
You can choose how to assign the chat:
- Staff → Assign to specific agent(s)
- Team → Assign to a group
🔍 Select Staff / Team
- Search and select users
- Choose one or multiple staff members
👉 Selected users will receive the assigned chat
🔄 Round Robin Assignment
Enable this option to distribute chats equally among selected staff.
How it works:
- Chats are assigned one by one
- Balanced distribution among team members
📌 Sticky Assignment
Assign returning customers to the same agent who handled them previously.
Use case:
- Maintain conversation continuity
- Improve customer experience
🤖 Bot Status
Control chatbot behavior for a specific user.
- Turn bot ON/OFF
Use case:
- Stop bot for VIP customer
- Enable bot again later
💬 Manual Chat
Pause chatbot and allow manual conversation.
- Bot stops responding
- Agent takes over
👉 Once conversation is closed:
- Bot will not resume automatically
🧾 Set Attribute
Update customer data in database.
You can update:
- Name
- Phone
- Address
- Custom fields
✅ Verify Attribute
Check existing customer data or conditions.
👉 Examples:
- Email = variable email
- Customer has tag
- Customer belongs to group
- Source = specific ad
👥 Add to Group
Add or remove customer from a group.
Use case:
- Add to “Leads” group
- Remove after conversion
Why It Matters
- Automates business processes
- Controls chatbot logic
- Updates customer data
- Enables advanced workflows
E-commerce Nodes
E-commerce Nodes allow you to integrate your product catalog, orders, and shopping experience directly into your chatbot. These nodes help you automate product discovery, order handling, and customer interactions related to your e-commerce business.
Available E-commerce Nodes
📦 Order Status
The Order Status Node allows you to update or manage the status of a customer’s order.
Use case:
- Mark order as confirmed
- Cancelled
🛍️ Products
The Products Node allows you to select and share catalog products directly with customers.
Use case:
- Showcase products
- Send product details
- Promote items
👉 Customers can view and interact with products inside WhatsApp.
🔍 Find Products
The Find Products Node allows customers to search for products based on their input.
How it works:
- Customer enters a keyword
- Chatbot searches products
- Matching products are displayed
Use case:
- Product search
- Quick product discovery
📂 Categories
The Categories Node displays available product categories.
How it works:
- Show all categories
- Customer selects a category
- Chatbot lists products under that category
Use case:
- Structured browsing
- Easy product navigation
🧾 Order History
The Order History Node allows customers to view their previous orders.
Use case:
- Track past purchases
- Reorder products
- View order details
⛔ End Session
The End Session Node is used to close the chatbot conversation.
What it does:
- Ends the current chatbot flow
- Stops further automated responses
Use case:
- Conversation completed
- Customer request finished
Why It Matters
- Enables WhatsApp commerce experience
- Automates product discovery
- Simplifies order handling
- Improves customer engagement
Integration Nodes
Integration Nodes allow you to connect your chatbot with external systems and services. Using these nodes, you can send and receive data, store customer information, and enable advanced workflows such as payments and database updates.
Available Integration Nodes
🔗 REST API
The REST API Node allows you to connect your chatbot with external APIs.
You can configure:
- Base URL
- Headers
- Request Body
👉 The API response can be stored in variables and used later in the chatbot flow.
Use case:
- Fetch product details from external system
- Send lead data to CRM
- Validate user information
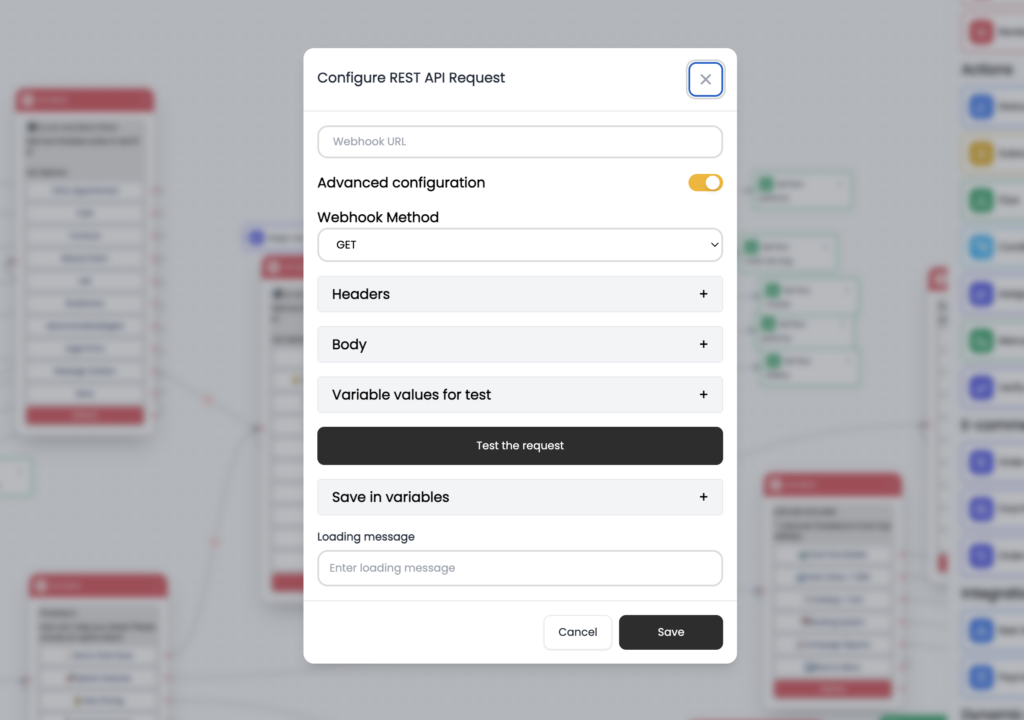
Configuration
When you configure the REST API Node, you will see the following options:
🌐 Webhook URL (Required)
Enter the API endpoint URL.
Example:https://api.example.com/get-data
⚙️ Webhook Method
Select request type:
- GET → Fetch data
- POST → Send data
- PUT / DELETE (if supported)
🔧 Advanced Configuration
Enable this to configure headers, body, and testing.
📌 Headers (Optional)
Add request headers.
Example:
- Authorization
- Content-Type
👉 Used for API authentication and configuration
📦 Body (Optional – Mostly for POST)
Send data to API.
Example JSON:
{
  "name": "{{customer_name}}",
  "phone": "{{mobile}}"
}
👉 You can use variables inside body
🧪 Variable Values for Test
Used for testing API before live execution.
👉 Assign sample values to variables for testing
▶️ Test the Request
Click this button to test API response before saving.
👉 Helps verify:
- API working
- Response format correct
💾 Save in Variables
Store API response into variables.
Example:
{{api_response}}👉 You can later use:
{{api_response.name}}{{api_response.status}}
⏳ Loading Message (Optional)
Message shown while API is processing.
Example:
“Please wait, fetching details…”
📊 Google Sheets
The Google Sheets Node allows you to store chatbot data directly into a selected Google Sheet.
What you can do:
- Save customer details
- Store form responses
- Maintain lead database
👉 Data collected from chatbot (variables) can be pushed into Google Sheets automatically.
Use case:
- Lead capture
- Booking records
- Data tracking
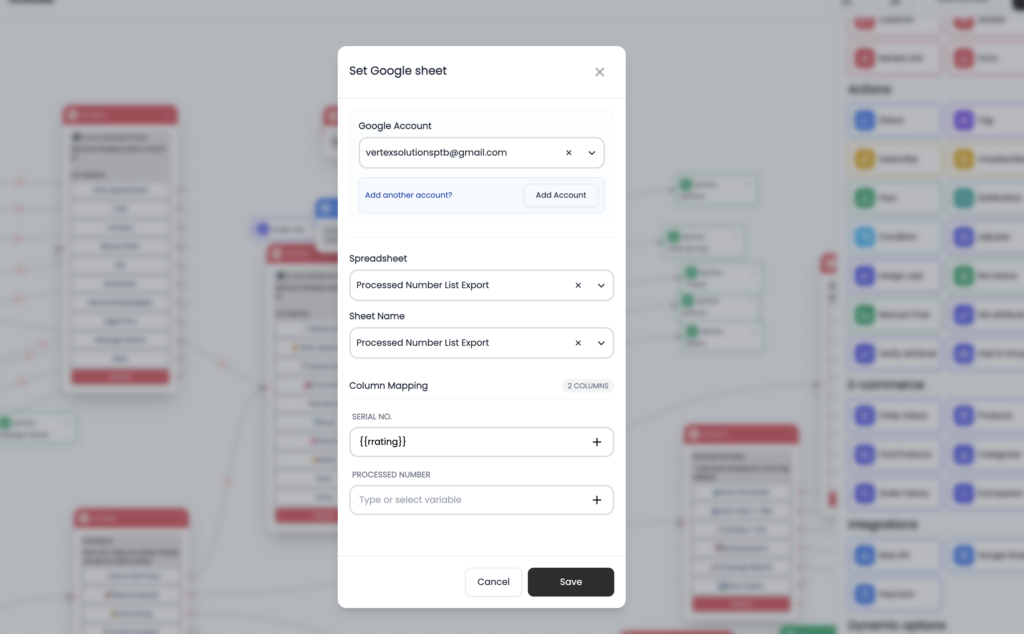
Configuration
When you configure the Google Sheets Node, you will see the following options:
🔐 Google Account (Required)
Select or connect your Google account.
- Choose an existing account
- Or click Add Account to connect a new one
📁 Spreadsheet (Required)
Select the Google Sheet where data will be stored.
👉 Example:
“Leads Data”
📄 Sheet Name (Required)
Select the specific sheet (tab) inside the spreadsheet.
👉 Example:
“Sheet1”
🔗 Column Mapping (Required)
Map chatbot variables to Google Sheet columns.
How it works:
- Each column in Google Sheet = one field
- Assign variables to each column
💾 Example Mapping
| Google Sheet Column | Variable |
|---|---|
| Name | {{customer_name}} |
| Phone | {{mobile}} |
| Rating | {{rating}} |
👉 When chatbot runs, data is saved automatically
💳 Payment
The Payment Node allows you to collect payments directly inside the chatbot.
What you can do:
- Send payment link
- Collect payment from customer
- Confirm transaction
👉 Helps you complete transactions without leaving WhatsApp.
Use case:
- Service booking payment
- Product purchase
- Advance payment collection
Why It Matters
- Connect chatbot with external systems
- Automate data flow
- Enable real-time processing
- Improve business automation
Dynamic Nodes
Dynamic Nodes allow you to display real-time data inside your chatbot flow. Instead of showing fixed options, these nodes fetch data from APIs, databases, or JSON and display it dynamically to users.
This helps you create intelligent and flexible chatbot experiences based on live data.
Available Dynamic Nodes
📋 Smart List
The Smart List Node allows you to display a list of options dynamically based on external data.
How it works:
- Fetch data from API or JSON
- Convert data into list format
- Show options to the user
Use case:
- Available doctors list
- Available time slots
- Product availability
- Service options
👉 The list changes dynamically based on real-time data.
🔘 Smart Button
The Smart Button Node allows you to generate buttons dynamically.
How it works:
- Fetch data from API or database
- Convert into button options
- Display to user
Use case:
- Dynamic service selection
- Booking slots
- Available locations
👉 Buttons are generated based on live data.
Where Data Comes From
Dynamic Nodes can fetch data from:
- REST APIs
- Database responses
- JSON data
Why It Matters
- Show real-time data
- Avoid hardcoded options
- Improve user experience
- Enable smart automation
Example
Customer selects “Book Appointment”
Chatbot shows:
👉 Available Doctors
- Dr. Ahmed
- Dr. John
👉 Available Time Slots
- 10:00 AM
- 11:30 AM
(All fetched dynamically)